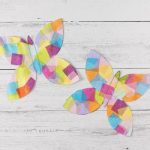
What is Craft Paper Mosaic Art?
To put it simply, it’s the art of assembling small pieces of colored paper—called “tiles”—to create a complete image or design. Think of it like building a picture with tiny puzzle pieces. These paper bits can be square, round, or totally random in shape. The idea is to fill in an outline with these pieces, carefully placed next to each other, to build up a colorful final result.
What makes craft paper mosaic art so appealing is how accessible it is. No fancy supplies or years of experience are required. All you need is some paper, glue, and time. Yet, the results can look incredibly professional and artistic!
The Joy of Making Mosaics
There’s something uniquely satisfying about seeing a blank page gradually turn into a lively work of art. It’s a bit like painting with paper. Every piece you glue down brings your design closer to life. And because it’s a slow, step-by-step process, it’s the perfect craft to help you relax and unplug.
Here’s why so many people fall in love with mosaic art:
- Creative Expression: You get to choose the colors, shapes, and final image. It’s your artistic playground.
- Stress Relief: Tearing and pasting paper is oddly therapeutic. It helps your mind focus and unwind.
- Low Cost: Most of what you need can be found at home—old magazines, colored paper, glue.
- Fun for All Ages: Whether you’re 5 or 55, making mosaics is enjoyable for everyone.
- Sustainable: It’s a great way to reuse scrap paper or packaging that might otherwise be thrown away.
What You’ll Need
The best part? You don’t need much to get started. Here’s a basic supply list:
- Colored craft paper – plain, printed, or textured
- Base paper – cardstock, cardboard, or canvas board
- Glue – glue stick or white glue works well
- Scissors – or just your fingers for tearing
- Pencil – to sketch your outline
Optional but helpful:
- Ruler – for cutting uniform shapes
- Tweezers – for placing tiny paper pieces
- Markers or gel pens – to add finishing touches or outlines
You can even include recycled paper like newspaper, old book pages, or gift wrap for a mixed-media effect!
Creating Your First Paper Mosaic
Ready to get started? Follow these easy steps:
Step 1: Choose Your Design
Start with something simple. Abstract patterns, hearts, stars, or flowers are perfect for beginners. If you want to be more precise, print out a coloring page and use that as your template.
Step 2: Cut or Tear Your Paper
Prepare your “tiles” by cutting or tearing your colored paper into small pieces. These can be any shape—squares for a neat look, or torn edges for a textured effect. Having a variety of sizes and shapes can add depth and interest.
Step 3: Sketch Your Outline
Lightly draw your design on the base paper with a pencil. Don’t worry about being perfect—it’s just a guide.
Step 4: Start Gluing
Work section by section, applying glue to a small area at a time and placing your paper pieces down. You can slightly overlap them or leave tiny spaces depending on your style.
Step 5: Fill in the Details
Continue filling in your design until it’s complete. Don’t forget to take breaks—this is a marathon, not a sprint!
Step 6: Let It Dry
Once your design is filled in, let the glue dry completely. You can then frame it, use it as a card, or just admire your hard work.
Mosaic Ideas for Every Mood
Feeling stuck on what to make? Here are some ideas to spark your creativity:
Nature Scenes: Trees, flowers, birds, or sunrises.
Festive Decor: Rangolis, Christmas stars, Eid lamps, or Holi patterns.
Inspirational Quotes: Combine mosaic backgrounds with hand-lettered messages.
Abstract Designs: Just let the colors and shapes flow!
Portraits: More advanced, but stunning once done.
Mosaics are perfect for wall decor, handmade gifts, greeting cards, or even journal covers.
Tips to Make Your Mosaic Shine
- Plan your color palette: Too many colors can overwhelm the design. Stick to 3-5 complementary shades for harmony.
- Start from the center: If your design has a focal point, build outward for better symmetry.
- Use contrast: Dark and light colors placed side-by-side will make your design pop.
- Don’t worry about perfection: Small imperfections often add character to handmade art.
Wrapping Up
Craft paper mosaic art is proof that you don’t need expensive materials or artistic training to create something beautiful. Just paper, glue, and your imagination. It’s relaxing, fulfilling, and gives you a unique piece of art to cherish or share.
So go ahead—dive into your paper stash, let your fingers do the crafting, and let the mosaic magic unfold. You never know what masterpiece you might create, one little paper piece at a time.